DVD Map based MMCS A01-A04 - The Definitive Guide for CCJ
Posted: Mon Jul 26, 2010 4:39 pm
Introduction (Last update 140315)
I will be updating this as I go along so check back often.
This thread will act as a one stop link on our site for the MMCS.
Further down in this thread you will find information of the Easter Eggs of our MMCS.
Model Revisions and Maps
Since the release of the CJ in 2007, Mitsubishi Motors have installed 4 different units in their vehicles. These range from A01, A02 , A03 and A04 which is the last of the current revision.
Since 2012, MMAL have changed the MMCS installed in our car to a new non map-disc based system.
The best way to tell the difference is:
1st Gen:
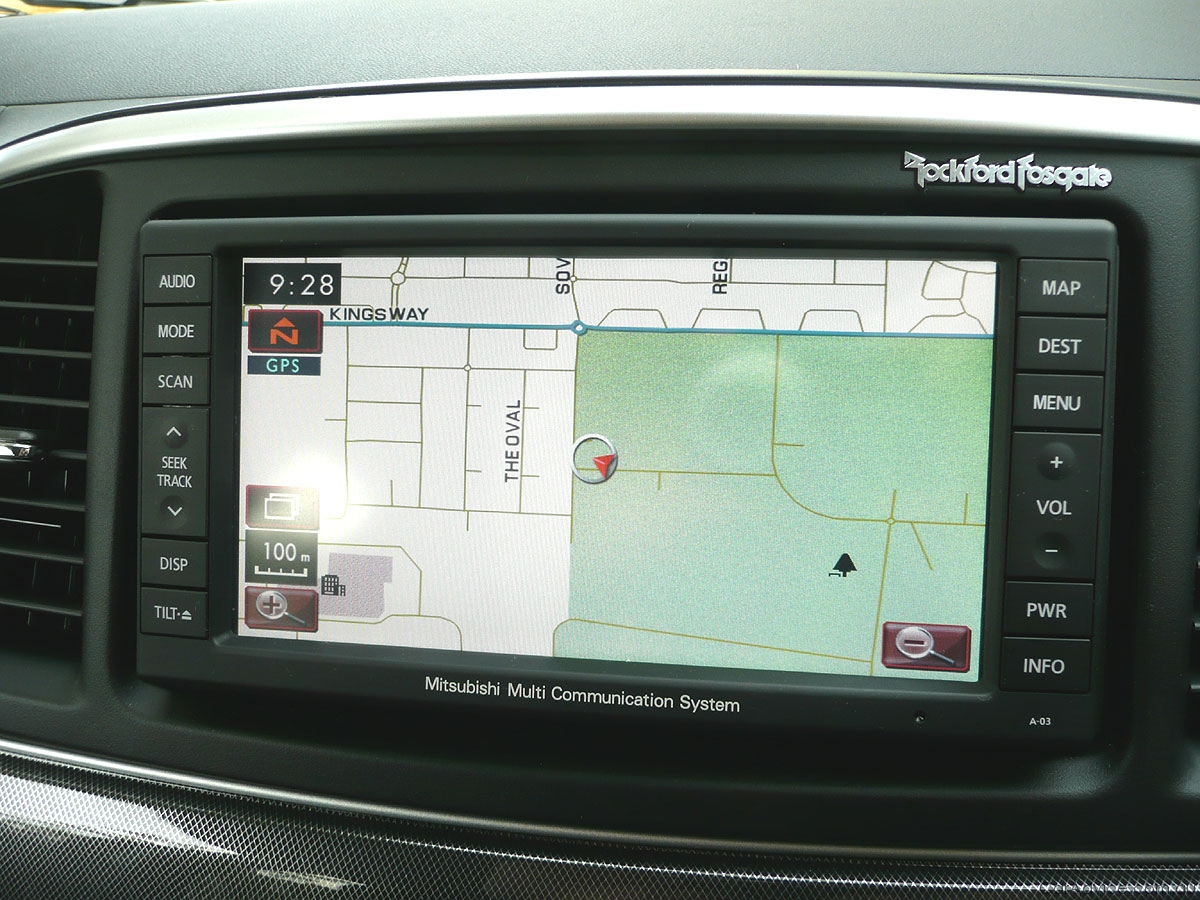
NOTE
Although looking similar, the US and UK MMCS versions are not recommended for use in Australia.
These are Hard Disk based systems and though hackable, there are NO known maps available for Australia which kind of defeats the purpose of a MMCS.
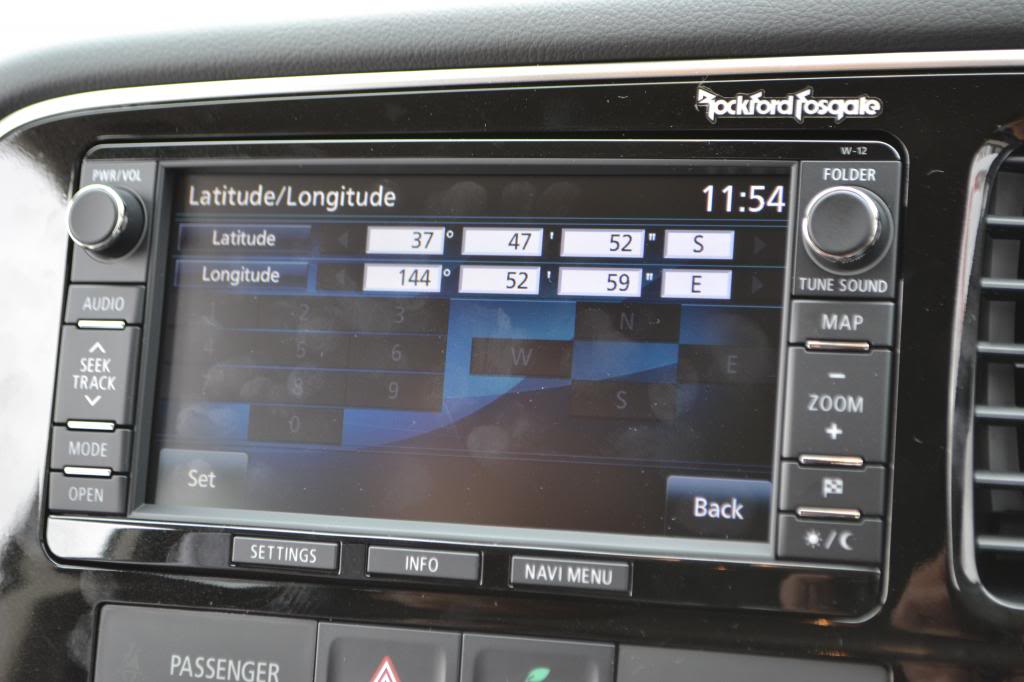
The difference aesthetically is the presence of a knob dial on the bottom right of the fascia as shown:
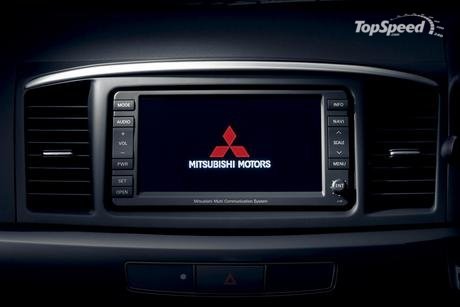
2nd Gen
Since MY12, MMAL have distributed a new Gen 2 MMCS system:
This thread is dedicated to the 1st Gen MMCS and does NOT provide any information for the new system locally.
If you want more information, refer here.
update for 2nd Gen MMCS:
Apparently the maps are supplied by Navteq (by Garmin). And there's free upgrades for 3 yrs from when you buy the car. Information here.
The maps which have been used in these are Disc based and supplied by: Whereis maps. Here they are:
Ver.14 - 2007
Ver.15 (MZ360297EX) - 2008
Ver.16 - 2009 (Megaupload Link available. PM for more details. Only available to premium members)
Ver.17 - 2010 (released Mar 2011)
Ver.18 - 2011 (released Mar 2012) -> Includes ROM based firmware upgrade
Ver.19 - There was no Ver.19 by MMAL. Tested the Ver. 19 Map Disc produced by Subaru for their system which works in our MMCS.
Ver.20 - Released 4 Apr 2014 by Whereis. Group buy successfully carried out.
Other MMCS Threads:
MMCS Owners
how to - sink MMCS flush with the dash
Service Modes
Also known as Easter Eggs. Here are some listings of how you can engage them and some useful changes you may make to them.
1. MMCS Service Modes
Service Mode 1:
To vary the settings of the MMCS Unit i.e. To access the MMCS service menu
a. Prior to starting, PLEASE check your Navigation DVD is inserted
b. Turn ignition on, press agree.
c. Press Audio then PWR - should be at the Audio Off screen, no keys displayed. Shown below:
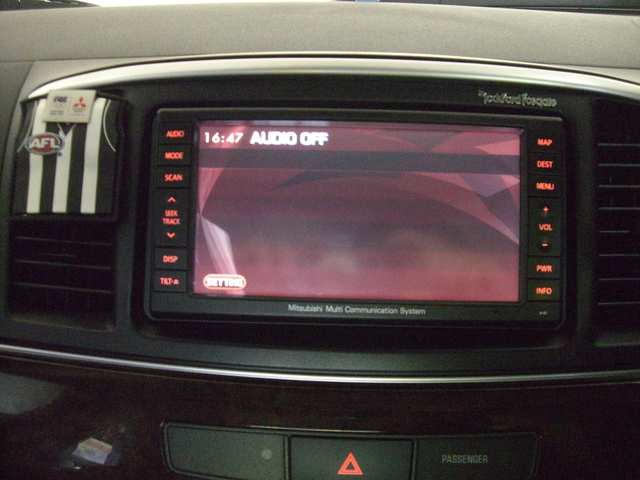
d. There are 4 hidden keys on this screen as shown below:
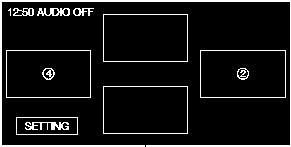
Press 4 then 2 then 4 then 2 then 4 then 2
e. You'll now get this:
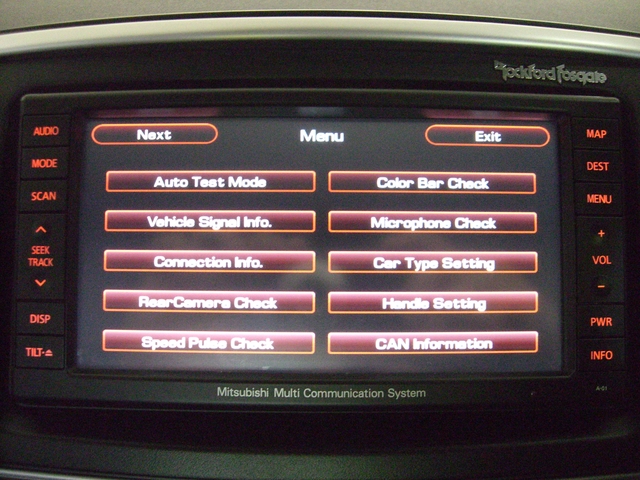
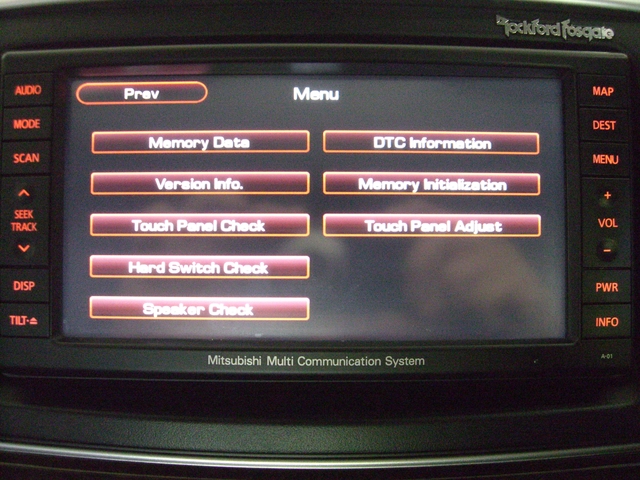
The next menu is:
Service Mode 2:
To access the MMCS service menu
1. Prior to starting, PLEASE check your Navigation DVD is inserted
2. Turn ignition on, press agree.
3. Press Audio then PWR - should be at the Audio Off screen, no keys displayed. Shown below:

4. There are 4 hidden keys on this screen as shown below:

......1
4.........2
......3
Press 1 then 3 then 2 then 3 then 1 then 3 then 4 then 2 (13131342)
Menu Page 1:
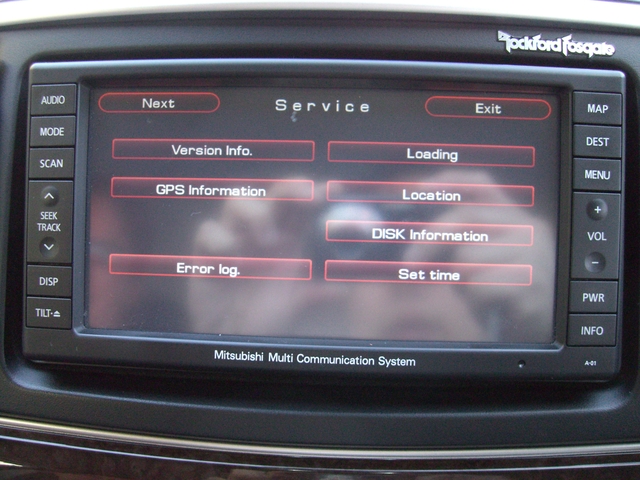
Page 2:
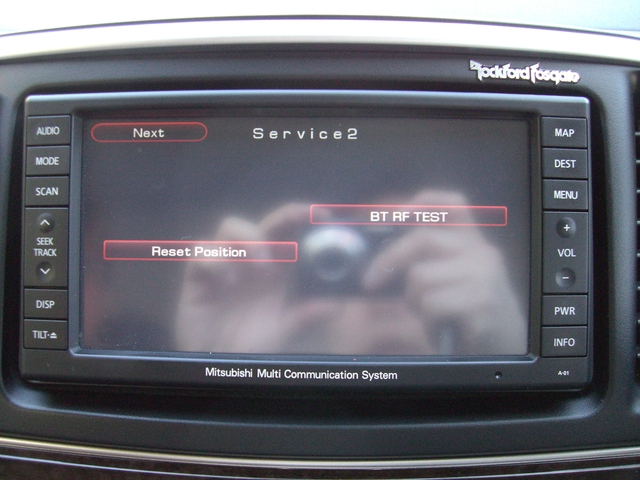
Page 3:
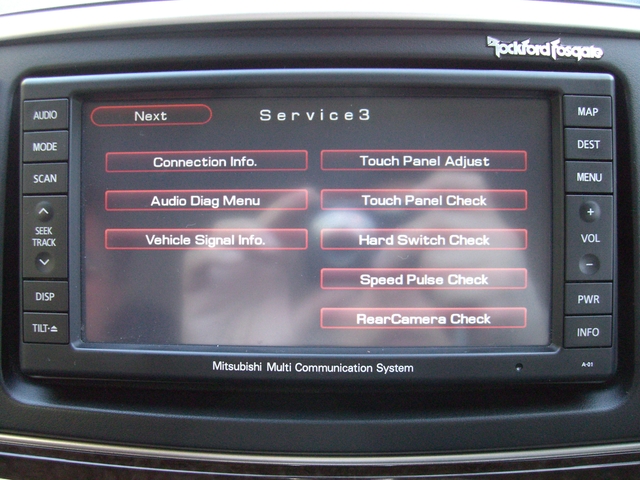
Page 4:
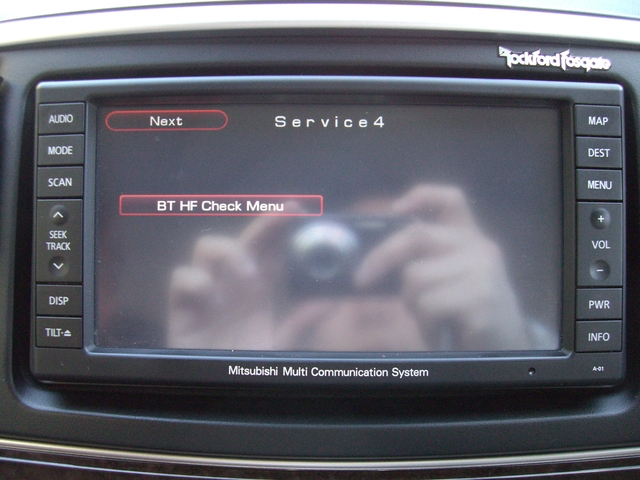
2. ETACS Variations
3. Ejecting Map DVD
In the unlikely case that you MMCS "hangs" and none of the buttons are clickable
a) Click Tilt
b) Once the screen tilts, click the screen on the top right hand corner.
Map DVD should now eject... .
FAQ
1. Ques: Where is the Speed Sensor Wire?
2. Ques: I want to be able to watch my DVD whilst driving, what can I do?
There's still no hack for it. There are now two aftermarket solutions:
The preferred option on this forum is available through JDM Parts.
The other which is available here in Australia is from this place.
Dissecting the MMCS
As many of you might know I recently acquired a faulty MMCS system from SPIKE. He was very generous in offering me the faulty set FOC which I have now taken apart to fix.
I have to courses of action:
a) Simply fix the screen then sell it again. *PREFERRED*
OR
b) Fix the screen and use it to reverse engineer a solution whereby I can offer some kind of FIRMWARE or HARDWARE fix to our Media play during motion. *NOT PREFERRED as Too much work for too little gain*
Why this Thread?
I've always thought it'd be good to add to the knowledge base of what we know about our cars and this adds to the already abundant set of knowledge available on forums about this unit.
Here are an excerpt of some of them:
Internet Information Links
Pajero 4WD Club of Victoria
1. MMCS
2. MMCS Speed Override & iPod Cables!
3. MMCS Video Out
4. Bluetooth Motion detection - VERY LONG and FULL of info
5. Dissecting the Aussie MMCS
6. SATNAV map v16 - No Torrent Link yet. So don't waste your time looking
Eclipse AVN6000 Profile
What seems to be our model... .
Images - Enjoy the pictures!
Sorry I was lazy and didn't take the initial disassembly pics. I only started pics once it got abit more complicated:
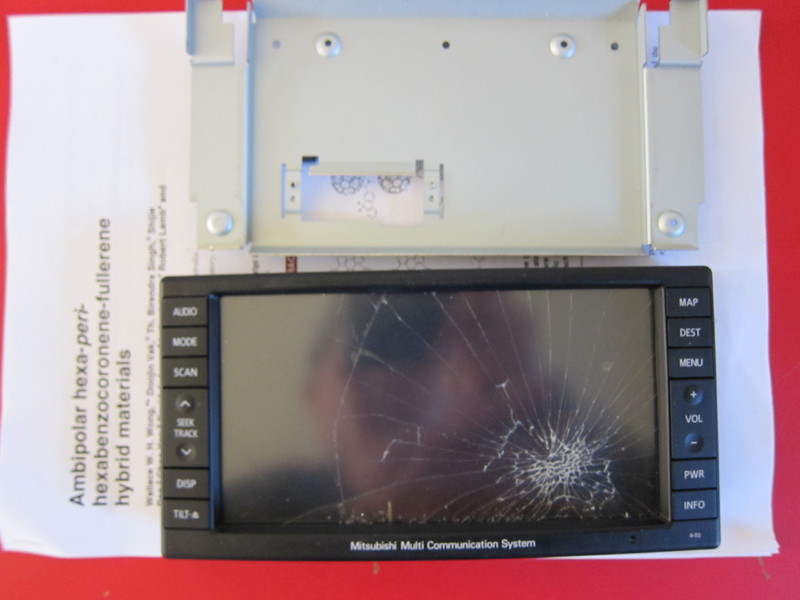
1. Cracked Screen
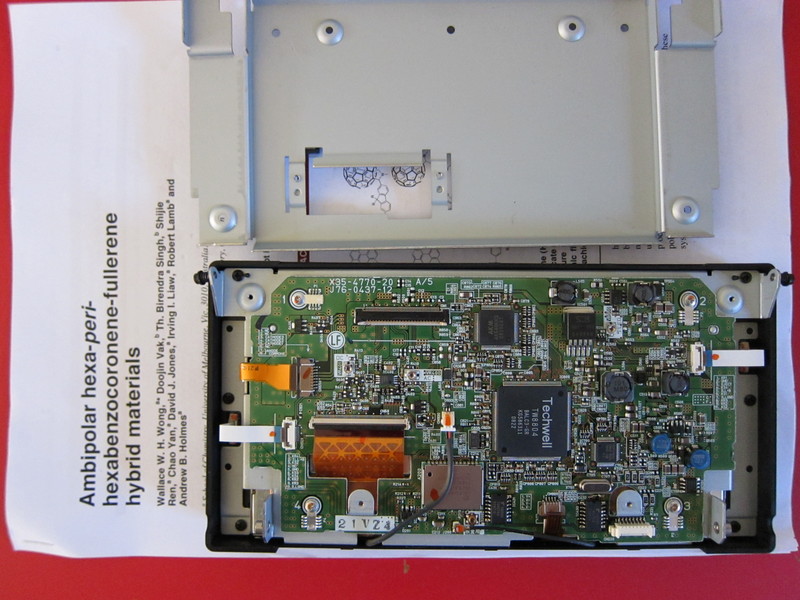
2.Rear of Cracked Screen
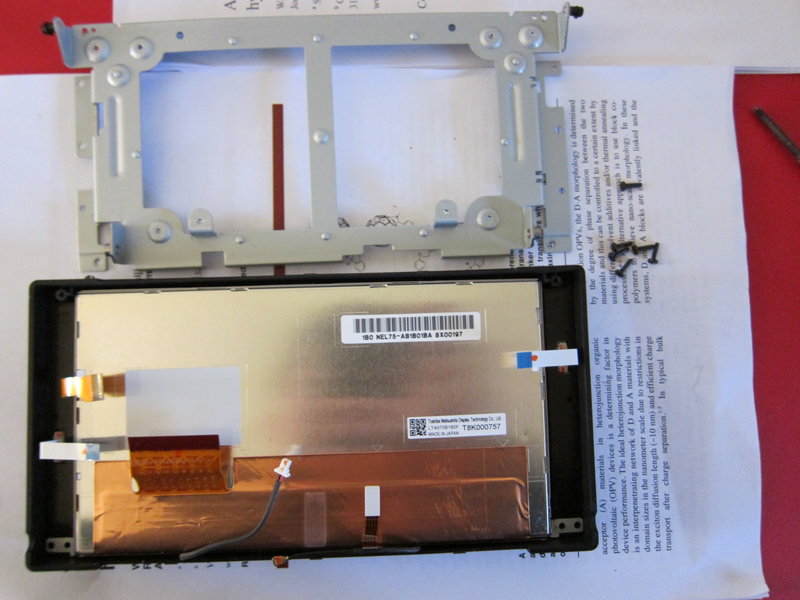
3. Rear of LCD Panel with board out of the way
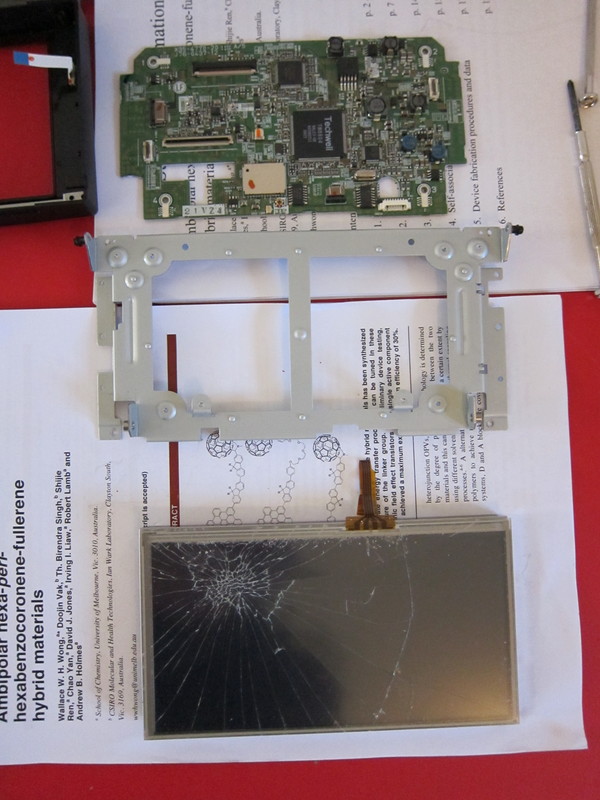
4.Cracked Screen shown separated.
As I mentioned earlier, I will be adding to this thread as I go along.
I will be updating this as I go along so check back often.
This thread will act as a one stop link on our site for the MMCS.
Further down in this thread you will find information of the Easter Eggs of our MMCS.
Model Revisions and Maps
Since the release of the CJ in 2007, Mitsubishi Motors have installed 4 different units in their vehicles. These range from A01, A02 , A03 and A04 which is the last of the current revision.
Since 2012, MMAL have changed the MMCS installed in our car to a new non map-disc based system.
The best way to tell the difference is:
1st Gen:

NOTE
Although looking similar, the US and UK MMCS versions are not recommended for use in Australia.
These are Hard Disk based systems and though hackable, there are NO known maps available for Australia which kind of defeats the purpose of a MMCS.
The difference aesthetically is the presence of a knob dial on the bottom right of the fascia as shown:

2nd Gen
Since MY12, MMAL have distributed a new Gen 2 MMCS system:

This thread is dedicated to the 1st Gen MMCS and does NOT provide any information for the new system locally.
If you want more information, refer here.
update for 2nd Gen MMCS:
Apparently the maps are supplied by Navteq (by Garmin). And there's free upgrades for 3 yrs from when you buy the car. Information here.
The maps which have been used in these are Disc based and supplied by: Whereis maps. Here they are:
Ver.14 - 2007
Ver.15 (MZ360297EX) - 2008
Ver.16 - 2009 (Megaupload Link available. PM for more details. Only available to premium members)
Ver.17 - 2010 (released Mar 2011)
Ver.18 - 2011 (released Mar 2012) -> Includes ROM based firmware upgrade
Ver.19 - There was no Ver.19 by MMAL. Tested the Ver. 19 Map Disc produced by Subaru for their system which works in our MMCS.
Ver.20 - Released 4 Apr 2014 by Whereis. Group buy successfully carried out.
Other MMCS Threads:
MMCS Owners
how to - sink MMCS flush with the dash
Service Modes
Also known as Easter Eggs. Here are some listings of how you can engage them and some useful changes you may make to them.
1. MMCS Service Modes
Service Mode 1:
To vary the settings of the MMCS Unit i.e. To access the MMCS service menu
a. Prior to starting, PLEASE check your Navigation DVD is inserted
b. Turn ignition on, press agree.
c. Press Audio then PWR - should be at the Audio Off screen, no keys displayed. Shown below:

d. There are 4 hidden keys on this screen as shown below:

Press 4 then 2 then 4 then 2 then 4 then 2
e. You'll now get this:

The next menu is:

Service Mode 2:
To access the MMCS service menu
1. Prior to starting, PLEASE check your Navigation DVD is inserted
2. Turn ignition on, press agree.
3. Press Audio then PWR - should be at the Audio Off screen, no keys displayed. Shown below:

4. There are 4 hidden keys on this screen as shown below:

......1
4.........2
......3
Press 1 then 3 then 2 then 3 then 1 then 3 then 4 then 2 (13131342)
Menu Page 1:

Page 2:

Page 3:

Page 4:

2. ETACS Variations
3. Ejecting Map DVD
In the unlikely case that you MMCS "hangs" and none of the buttons are clickable
a) Click Tilt
b) Once the screen tilts, click the screen on the top right hand corner.
Map DVD should now eject... .
FAQ
1. Ques: Where is the Speed Sensor Wire?
Aspired wrote:Can't you just connect an inline switch on the MMCS speed sensor wire so that when it is pushed in the signal is cut to the MMCS and it thinks the car is not moving so all your functions will be available, then after you have finished making your changes push the switch again to re establish the wires connection to the MMCS.
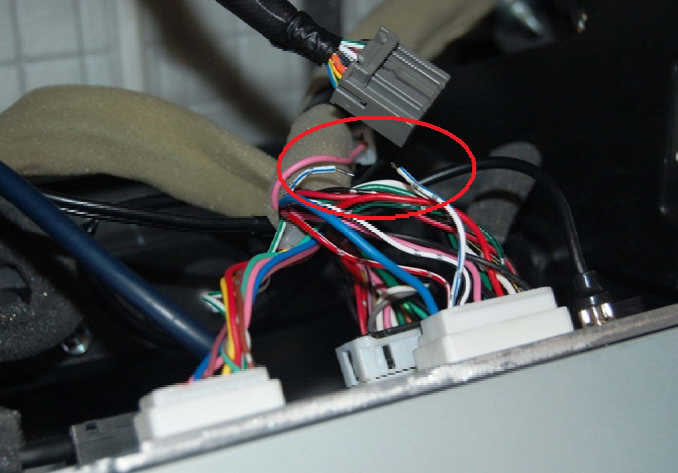
The speed sensor wire into the MMCS is in the top 20 pin molex connector and is the white wire with a blue stripe on the top right hand side of the plug.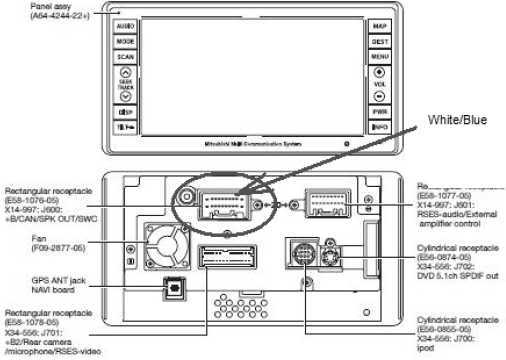
2. Ques: I want to be able to watch my DVD whilst driving, what can I do?
There's still no hack for it. There are now two aftermarket solutions:
The preferred option on this forum is available through JDM Parts.
The other which is available here in Australia is from this place.
ofey wrote:By listing a link, we are by no means endorsing him but providing the necessary information.
Dissecting the MMCS
As many of you might know I recently acquired a faulty MMCS system from SPIKE. He was very generous in offering me the faulty set FOC which I have now taken apart to fix.
I have to courses of action:
a) Simply fix the screen then sell it again. *PREFERRED*
OR
b) Fix the screen and use it to reverse engineer a solution whereby I can offer some kind of FIRMWARE or HARDWARE fix to our Media play during motion. *NOT PREFERRED as Too much work for too little gain*
Why this Thread?
I've always thought it'd be good to add to the knowledge base of what we know about our cars and this adds to the already abundant set of knowledge available on forums about this unit.
Here are an excerpt of some of them:
Internet Information Links
Pajero 4WD Club of Victoria
1. MMCS
2. MMCS Speed Override & iPod Cables!
3. MMCS Video Out
4. Bluetooth Motion detection - VERY LONG and FULL of info
5. Dissecting the Aussie MMCS
6. SATNAV map v16 - No Torrent Link yet. So don't waste your time looking
Eclipse AVN6000 Profile
What seems to be our model... .
Images - Enjoy the pictures!
Sorry I was lazy and didn't take the initial disassembly pics. I only started pics once it got abit more complicated:
1. Cracked Screen

2.Rear of Cracked Screen

3. Rear of LCD Panel with board out of the way

4.Cracked Screen shown separated.

As I mentioned earlier, I will be adding to this thread as I go along.
